이 글은 이 책을 참고하여 쓰여졌습니다.
먼저 사용자 정보를 담당할 domain인 User 클래스를 생성한다.
package com.david.book.springboot.domain.user;

import com.david.book.springboot.domain.BaseTimeEntity;
import lombok.Builder;
import lombok.Getter;
import lombok.NoArgsConstructor;

import javax.persistence.*;

@Getter
@NoArgsConstructor
@Entity
public class User extends BaseTimeEntity {
    @Id
    @GeneratedValue(strategy = GenerationType.IDENTITY)
    private Long id;

    @Column(nullable = false)
    private String name;

    @Column(nullable = false)
    private String email;

    @Column
    private String picture;

    @Enumerated(EnumType.STRING)
    @Column(nullable = false)
    private Role role;

    @Builder
    public User(String name,String email,String picture,
                Role role){
        this.name = name;
        this.email = email;
        this.picture = picture;
        this.role = role;
    }

    public User update(String name,String picture){
        this.name = name;
        this.picture = picture;

        return this;
    }

    public String getRoleKey(){
        return this.role.getKey();
    }
}
Entity클래스로, DB의 한 테이블에 해당된다. update 메소드와 권한을 반환하는 getRoleKey메소드가 정의되어 있다.
@Enumerated 는 원래 Enum을 사용시 DB에 정수로 저장되는데 그것 대신 String으로 저장하여 구분을 쉽게 하기 위해 사용한다.

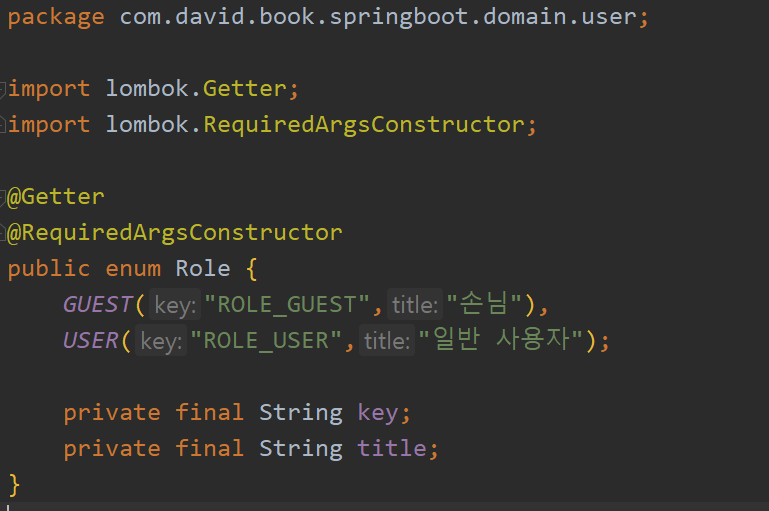
권한을 담은 enum Role 이다. 스프링 시큐리티에서는 항상 권한 코드 앞에 ROLE_가 있어야 한다고 한다.

UserRepository에는 가입 여부를 판단하기 위한 findByEmail 메소드만 작성

그 뒤 build.gradle에 oauth2 를 위한 의존성을 추가해준다.
package com.david.book.springboot.config.auth;


import com.david.book.springboot.domain.user.Role;
import lombok.RequiredArgsConstructor;
import org.springframework.security.config.annotation.web.builders.HttpSecurity;
import org.springframework.security.config.annotation.web.configuration.EnableWebSecurity;
import org.springframework.security.config.annotation.web.configuration.WebSecurityConfigurerAdapter;

@RequiredArgsConstructor
@EnableWebSecurity
public class SecurityConfig extends WebSecurityConfigurerAdapter {
    private final CustomOAuth2UserService customOAuth2UserService;

    @Override
    protected void configure(HttpSecurity http) throws Exception{
        http
                .csrf().disable()
                .headers().frameOptions().disable()
                .and().authorizeRequests()
                .antMatchers("/","/css/**","/images/**",
                        "/js/**","/h2-console/**").permitAll()
                .antMatchers("/api/v1/**").hasRole(Role.USER.name())
                .anyRequest().authenticated()
                .and()
                .logout()
                .logoutSuccessUrl("/")
                .and()
                .oauth2Login()
                .userInfoEndpoint()
                .userService(customOAuth2UserService);
    }
}
권한 별로 접근할수 있는 URL을 달리하게 하는 SecurityConfig 파일이다. UESR 만 /api/v1/ 에 접근할 수 있다. 또한 logoutSuccesUrl("/") 로 인해 로그아웃 시 인덱스 페이지로 이동하게 된다.
package com.david.book.springboot.config.auth;

import com.david.book.springboot.config.auth.dto.OAuthAttributes;
import com.david.book.springboot.config.auth.dto.SessionUser;
import com.david.book.springboot.domain.posts.UserRepository;
import com.david.book.springboot.domain.user.User;
import lombok.RequiredArgsConstructor;
import org.springframework.security.core.authority.SimpleGrantedAuthority;
import org.springframework.security.oauth2.client.userinfo.DefaultOAuth2UserService;
import org.springframework.security.oauth2.client.userinfo.OAuth2UserRequest;
import org.springframework.security.oauth2.client.userinfo.OAuth2UserService;
import org.springframework.security.oauth2.core.OAuth2AuthenticationException;
import org.springframework.security.oauth2.core.user.DefaultOAuth2User;
import org.springframework.security.oauth2.core.user.OAuth2User;
import org.springframework.stereotype.Service;

import javax.servlet.http.HttpSession;
import java.util.Collections;

@RequiredArgsConstructor
@Service
public class CustomOAuth2UserService implements OAuth2UserService
        <OAuth2UserRequest,OAuth2User> {

    private final UserRepository userRepository;
    private final HttpSession httpSession;

    @Override
    public OAuth2User loadUser(OAuth2UserRequest userRequest)
            throws OAuth2AuthenticationException {
        OAuth2UserService<OAuth2UserRequest,OAuth2User> delegate
                = new DefaultOAuth2UserService();
        OAuth2User oAuth2User = delegate.loadUser(userRequest);


        // 어떤 서비스에서 로그인하는지 확인
        String registrationId = userRequest.getClientRegistration().getRegistrationId();
        // OAuth2 로그인 시 키가 되는 필드값
        String userNameAttributeName = userRequest.getClientRegistration().
                getProviderDetails().getUserInfoEndpoint().getUserNameAttributeName();

        // OAuth2UserService를 통해 가져온 OAuth2User의 Attribute를 담을 클래스
        OAuthAttributes attributes = OAuthAttributes.of(registrationId,userNameAttributeName,
                oAuth2User.getAttributes());

        User user = saveOrUpdate(attributes);
        httpSession.setAttribute("user",new SessionUser(user));

        return new DefaultOAuth2User(Collections.singleton(new
                SimpleGrantedAuthority(user.getRoleKey())),
        attributes.getAttributes(),
        attributes.getNameAttributeKey());
    }

    private User saveOrUpdate(OAuthAttributes attributes) {
        User user = userRepository.findByEmail(attributes.getEmail())
                .map(entity -> entity.update(attributes.getName(),
                        attributes.getPicture()))
                .orElse(attributes.toEntity());

        return userRepository.save(user);
    }
}
구글 로그인 이후에 가져온 정보(Attribute)를 기반으로 가입 및 정보수정, 세션 저장 등의 기능을 구현할 CustonOAuth2UserService 클래스이다. 특이한 점은 세션에 사용자 정보를 저장할 때 User 클래스 대신 SessionUser 클래스를 사용한 점인데, 이는 User 가 Entity클래스이기 때문에 나중에 다른 클래스들과 연관점이 생길 가능성이 높기 때문에 따로 SessionUser 클래스를 만들어 사용한다고 한다.
package com.david.book.springboot.config.auth.dto;

import com.david.book.springboot.domain.user.Role;
import com.david.book.springboot.domain.user.User;
import lombok.Builder;
import lombok.Getter;

import java.util.Map;

@Getter
public class OAuthAttributes {
    private Map<String,Object> attributes;
    private String nameAttributeKey;
    private String name;
    private String email;
    private String picture;

    @Builder
    public OAuthAttributes(Map<String,Object> attributes,
                           String nameAttributeKey,String name,
                           String email,String picture){
        this.attributes = attributes;
        this.nameAttributeKey = nameAttributeKey;
        this.name = name;
        this.email = email;
        this.picture = picture;
    }

    public static OAuthAttributes of(String registrationId,String userNameAttributeName,
                                     Map<String,Object> attributes){
        return ofGoogle(userNameAttributeName,attributes);
    }

    private static OAuthAttributes ofGoogle(String userNameAttributeName,Map<String,Object> attributes){
        return OAuthAttributes.builder()
                .name((String) attributes.get("name"))
                .email((String) attributes.get("email"))
                .picture((String) attributes.get("picture"))
                .attributes(attributes)
                .nameAttributeKey(userNameAttributeName)
                .build();
    }

    public User toEntity(){
        return User.builder()
                .name(name)
                .email(email)
                .picture(picture)
                .role(Role.GUEST)
                .build();
    }
}
다양한 계정 정보를 저장할 OAuthAttributes 클래스이다.

아까 언급한 SessionUser 클래스. 별다른 기능은 없다. 인증된 사용자 정보만 필요하기에 name,email,picture만 저장한다.

로그인 버튼을 추가하기 위한 머스테치 코드

마지막으로 IndexController에서 로그인 세션 정보를 받을 수 있게 해주면 된다. 로그인 정보가 있다면 if문이 실행되고 userName이 표시되게 된다.
'따라 공부하기 > Spring boot 혼자 개발하는 웹 서비스' 카테고리의 다른 글
| [Spring Boot]네이버 로그인 기능 추가 (0) | 2020.12.31 |
|---|---|
| [Spring Boot]어노테이션 기반으로 개선 + 세션 저장소 변경 (0) | 2020.12.30 |
| [Spring Boot]OAuth2 사용을 위한 구글 서비스 등록 (0) | 2020.12.28 |
| [Spring Boot]전체 조회 화면 구성, 게시글 수정과 삭제 (0) | 2020.12.27 |
| [Spring Boot]부트스트랩 이용하여 게시글 등록화면 만들기 (0) | 2020.12.26 |


댓글